

Telegram is a non-profit cloud-based instant messaging service. It is similar to WhatsApp and Facebook messenger in features but offers great security. Telegram apps are available for Android, iOS, Windows Phone, Windows NT, macOS, and Linux.
Telegram officially released bot platform on June 24, 2015. We can use Telegram Bot API to send messages to a channel or a group through our bot. We can use this for app notification, errors or monthly application reports. It is completely free to use their bot API. You can checkout Bots API on the official documentation.
In this tutorial, we will create a simple application that will send messages to a channel. Let’s start working on the application.
Table of Contents
Creating a laravel application
Let’s create a new Laravel application named Telegram. I am using laravel 5.6.3 for this tutorial. To create a new project, run the following command:
laravel new Telegram
Installing Telegram Bot API packages
In this tutorial, we will use Telegram Bot API PHP SDK package. This package is created and maintained by Syed Irfaq R. It supports laravel out of the box. It is unofficial Telegram Bot SDK. Let’s install this package through composer by running the following command:
composer require irazasyed/telegram-bot-sdk
It will install the package. If you are using laravel 5.4 or previous laravel 5 versions, you need to add Service Provider and facade for this package. If you are using the latest version of laravel, skip this step. To add Service Provider, add the following entry in providers array in config/app.php file.
Telegram\Bot\Laravel\TelegramServiceProvider::class,
Also, add the following entry in aliases array to setup facade present in config/app.php file.
'Telegram' => Telegram\Bot\Laravel\Facades\Telegram::class,
Now that we have set up Service Provider and Facade, let’s move on to the next step.
The last step is to publish configuration file. Open the terminal window and run the following command to publish the configuration:
php artisan vendor:publish --provider="Telegram\Bot\Laravel\TelegramServiceProvider"
Above command will publish a telegram.php configuration file in config directory. Here we will be setting up our configuration for the bot. Let’s create our bot first.
Creating a Telegram Bot
Let’s start by creating a Telegram Bot. First, you need to install Telegram app. You need to talk to BotFather to create a telegram bot. To do this, send a message to @BotFather. Visit the link through your mobile and click Send Message to start messaging BotFather.
Now click START at the bottom. It will start your communication with botfather by sending /start. To create a new bot, send /newbot to botfather. It will ask for a new name. I will call mine tutsforweb. Then, botfather will ask for a username. Username must end with the word bot. I will name mine tutsforwebbot. You can call it whatever you want but remember to follow the tutorial with your choosen username.
Successfully our bot is created. BotFather will send a message with a token to access HTTP API.
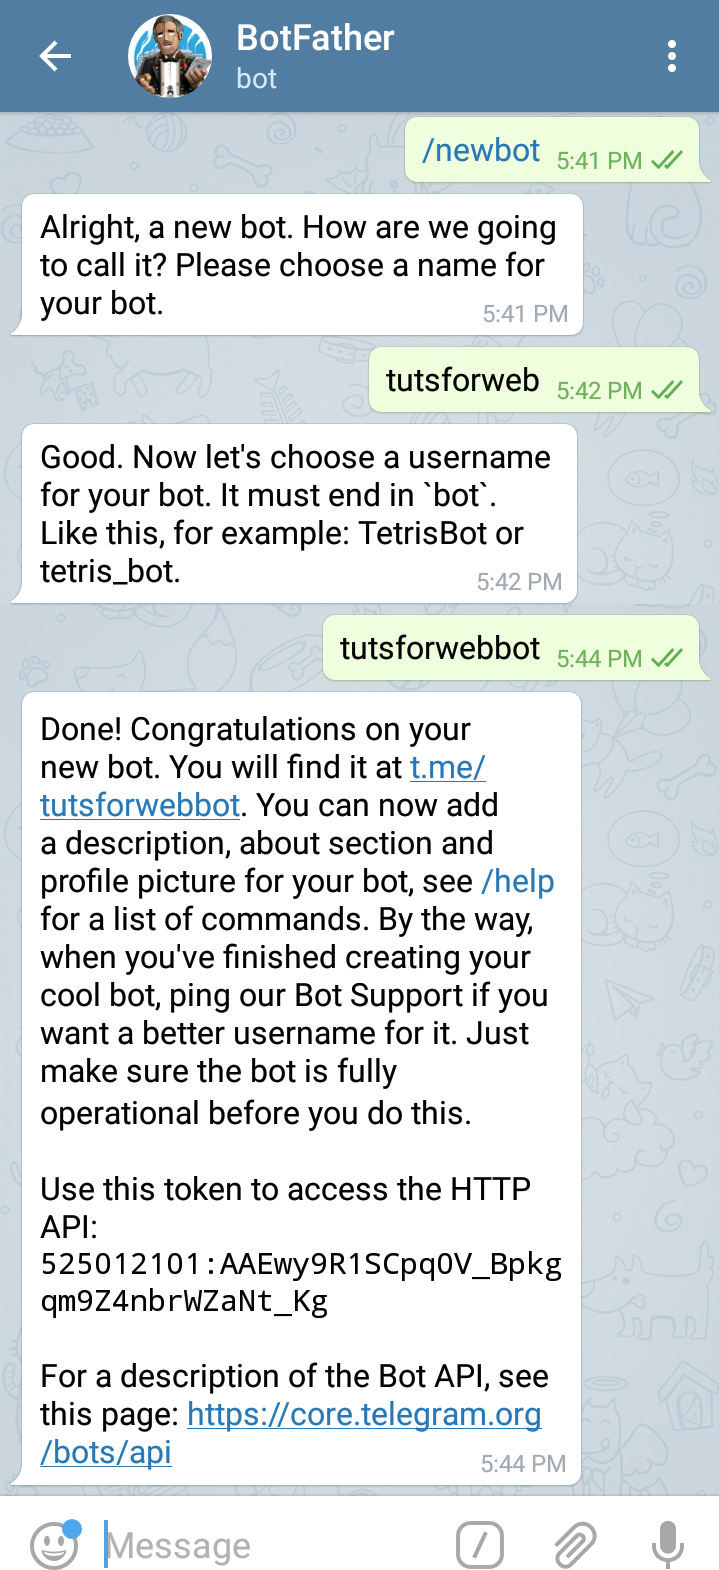
Copy the bot token and insert in .env file under the key TELEGRAM_BOT_TOKEN. So, you need to add a line like this in your .env file. Replace the token with your bot token in the line below. This token is for tutsforwebbot.
TELEGRAM_BOT_TOKEN=525012101:AAEwy9R1SCpq0V_Bpkgqm9Z4nbrWZaNt_Kg
You can also change other options such as name, description, profile pic and other options by sending commands to the botfather but we will not be doing that here. You can find all of these options here in the documentation.
Creating channel for notifications
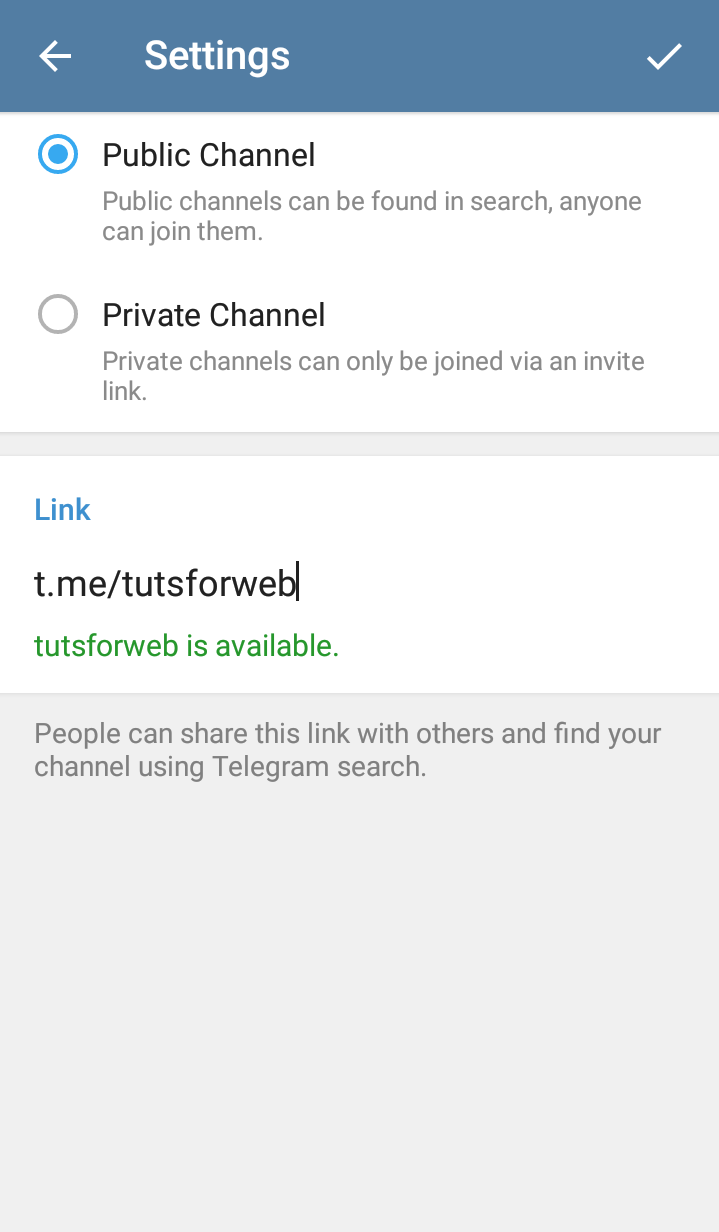
Now let’s create a new channel to send notifications. You can also choose to create a group instead but we will go with a channel. I will name my channel tutsforweb and make it public channel as well as set link to tutsforweb. Link will be t.me/tutsforweb.
Let’s add the bot as the admin for the channel. To do this, open the channel and click on its profile picture. Now click the settings icon and select Administrators.
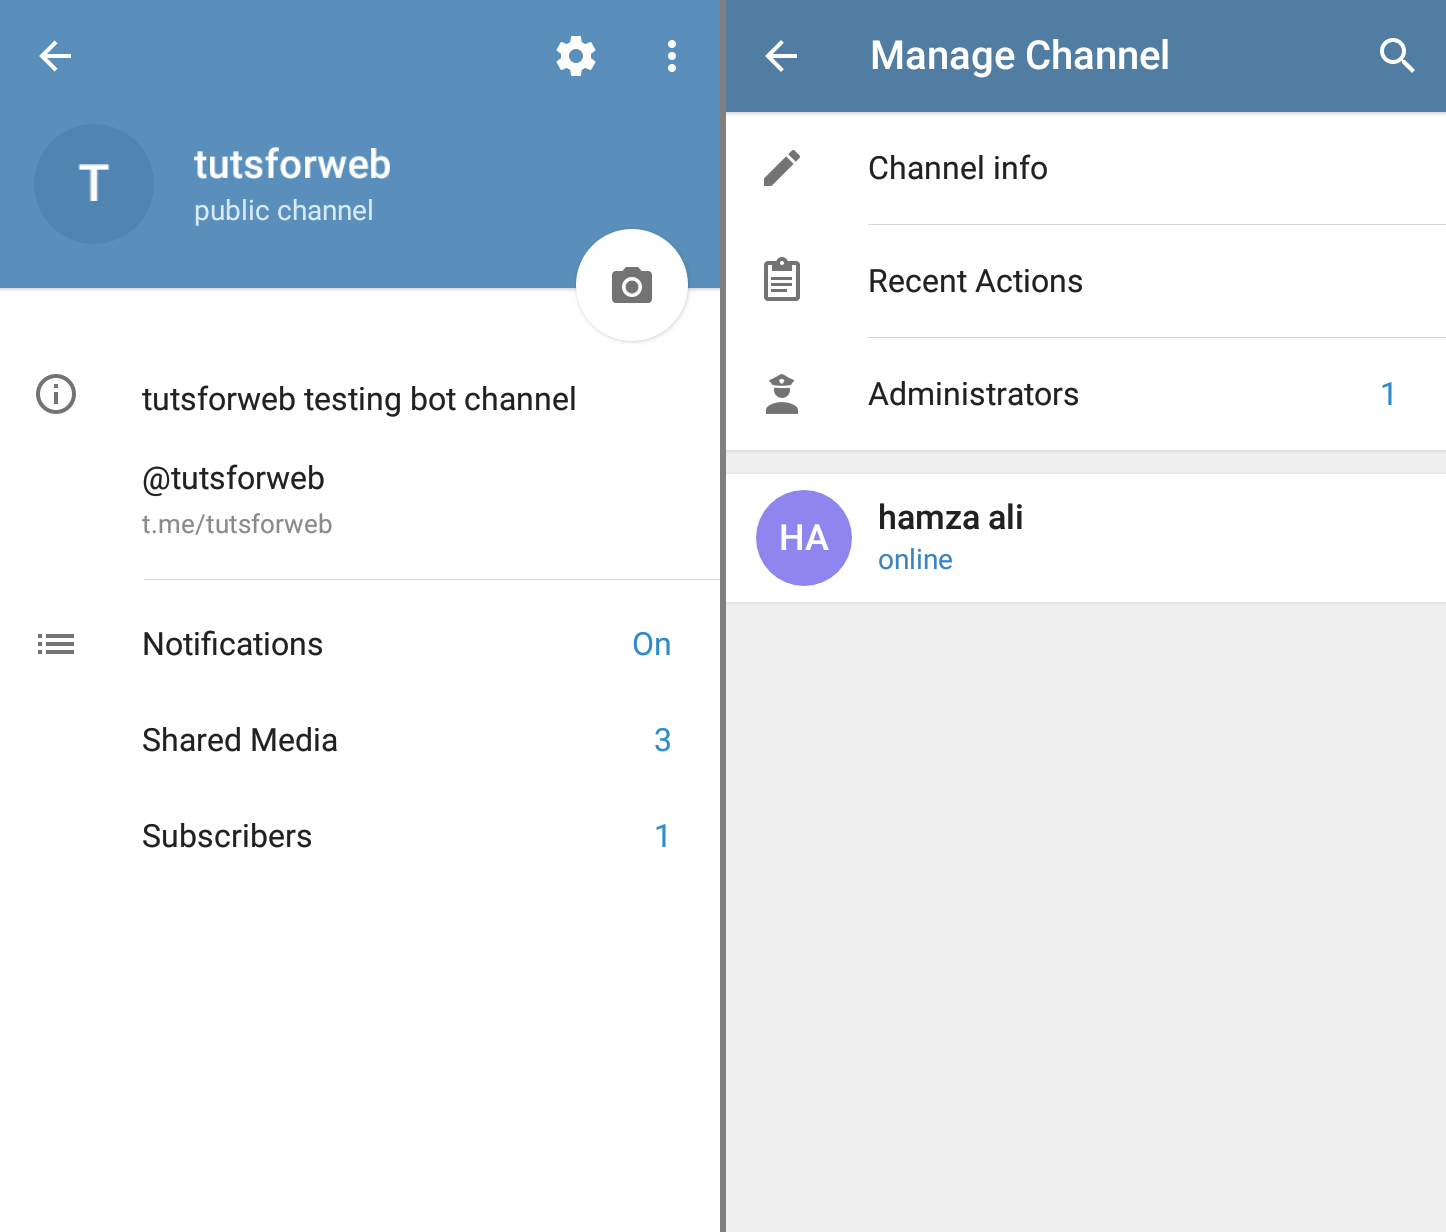
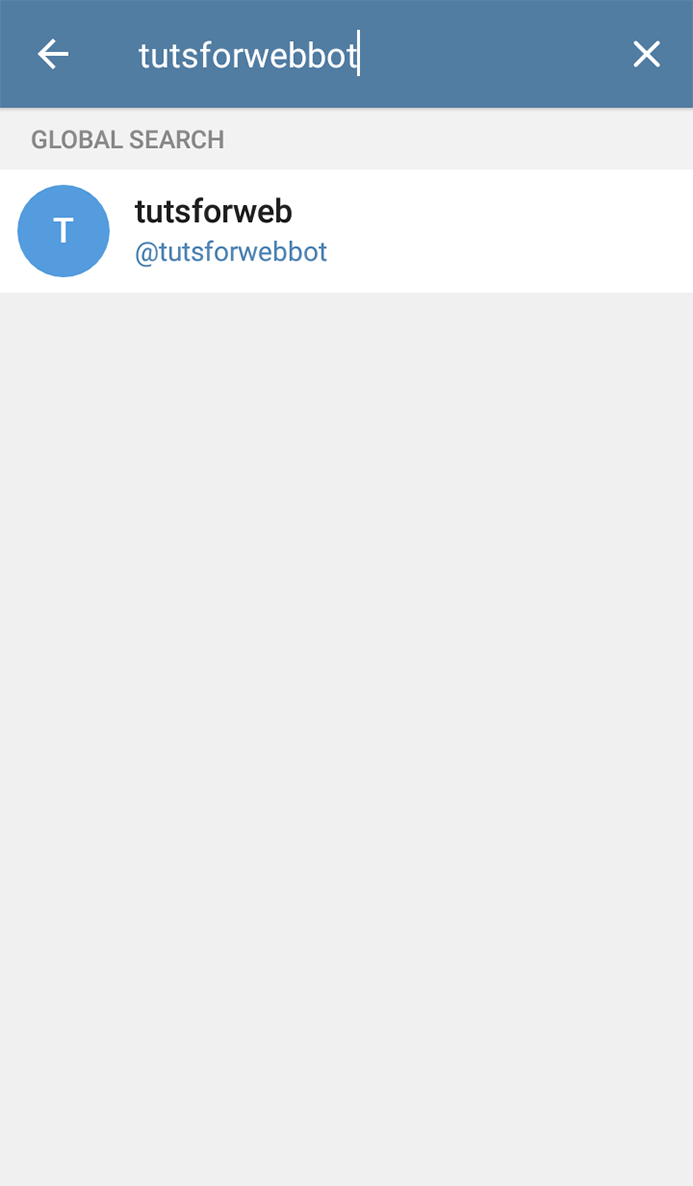
Now click Add administrator and add tutsforwebbot as the admin by searching for it by bot username.
Now, click the tick icon at the top right corner with default access selected. It will add our bot as the admin that will enable it to send messages to the channel.
Go to config/telegram.php and in your telegram bots section which is the first section, set username to your bots username. In my case, it is tutsforwebbot. Also, set the values for token, certificate_path and webhook_url in env function second parameter to empty string. This is how my bots key, value looks like:
'bots' => [
    'mybot' => [
        'username' => 'tutsforwebbot',
        'token' => env('TELEGRAM_BOT_TOKEN', ''),
        'certificate_path' => env('TELEGRAM_CERTIFICATE_PATH', ''),
        'webhook_url' => env('TELEGRAM_WEBHOOK_URL', ''),
        'commands' => [
        ],
    ],
],
We will not be using webhooks. Also, run the following command to configure cache:
php artisan config:cache
Obtaining channel CHAT_ID
To send messages or notifications to any channel, group or anyone requires chat_id. CHAT_ID is an integer which uniquely identifies a thread to which we can send the message in Telegram.
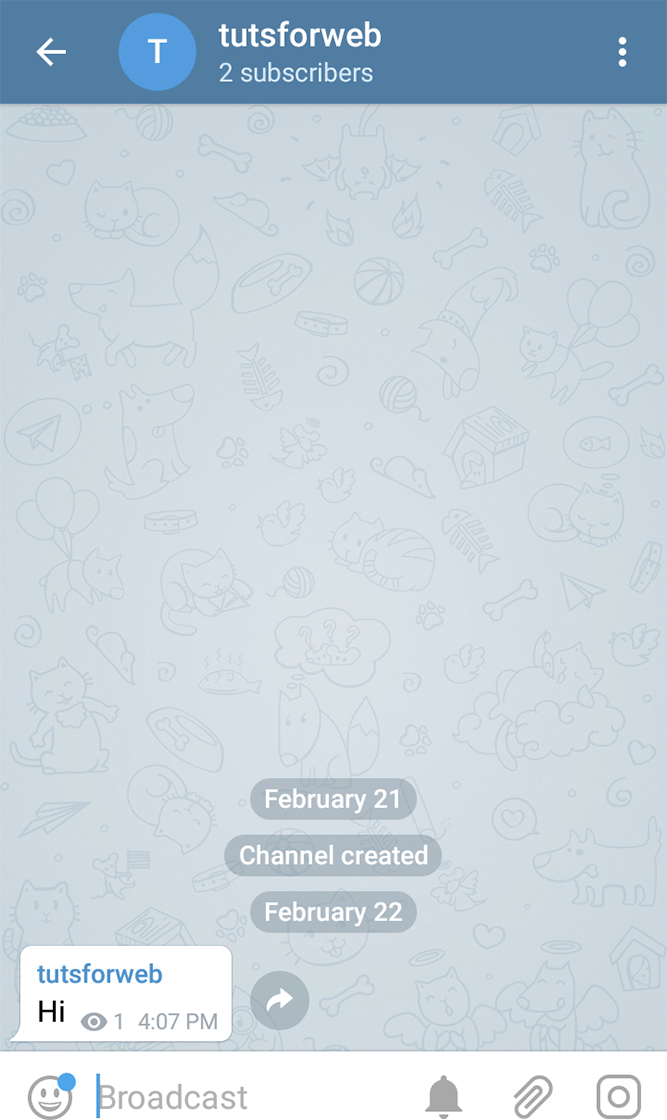
It is difficult to find chat_id for a thread. What we can do is send a message to our thread. I will send a message with text Hi to the tutsforweb channel. Of course, you can set the text to whatever you want because it does not matter.
Now, let’s create a method that will print tutsforwebbot updates. When we call this method, Telegram returns all of the related activity for our bot. We can use dd method to die and dump the response. The output response contains the channel and related chat_id number this bot belongs to.
To do this, create a new controller named TelegramBotController by running the following command in your terminal:
php artisan make:controller TelegramBotController
Now, add a new method named updatedActivity to the controller. Here’s how the file looks:
<?php

namespace App\Http\Controllers;

use Telegram\Bot\Laravel\Facades\Telegram;

class TelegramBotController extends Controller
{
    public function updatedActivity()
    {
        $activity = Telegram::getUpdates();
        dd($activity);
    }
}
Here we are using the getUpdates method on Telegram Facade and dumping the response. Now add a new route for this controller method by adding the following line to routes/web.php file:
Route::get('/updated-activity', 'TelegramBotController@updatedActivity');
Hit the /updated-activity endpoint through the browser. You might get an empty response like [ ]. Go to your channel and broadcast another message like "Hi". Hit the updated-activity endpoint again and you will find the response like this:
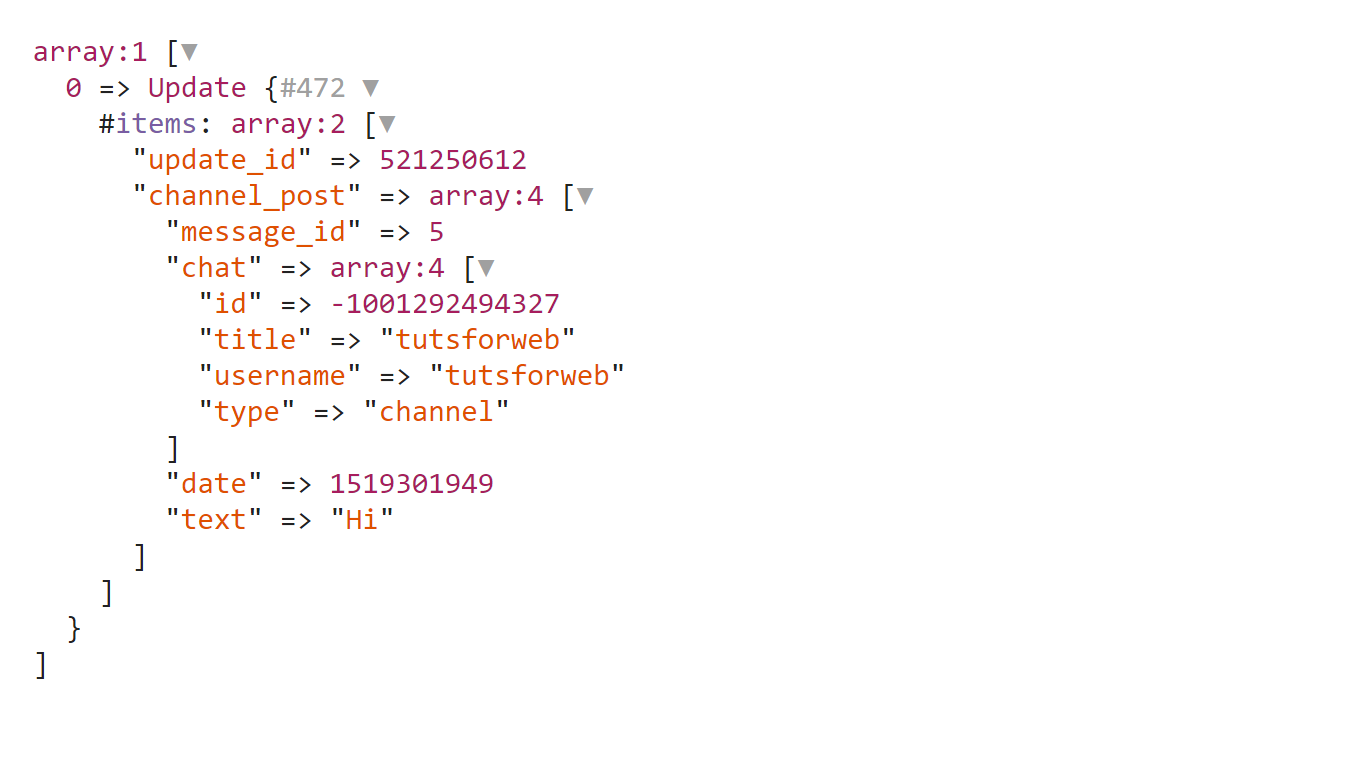
Now copy the id present in channel_post/chat/id which in my case is -1001292494327. Go to .env file and paste your chat id on TELEGRAM_CHANNEL_ID key. Here’s how this line looks in my case:
TELEGRAM_CHANNEL_ID=-1001292494327
If you have sent multiple messages to the channel or bot, you will find them in the array. Make sure you use the chat_id of the message for your channel. Run the following command again to configure cache:
php artisan config:cache
Creating views
In this application, we will be creating two forms, one for submitting our form and the other one for sending pictures. Contact us form will send email address and message to the channel. Let’s start by creating views for our two forms.
Create a new view file named layout.blade.php in resources/views directory. Now, copy the contents below to your layout file:
<!doctype html>
<html lang="en">
<head>
    <meta charset="UTF-8">
    <meta name="viewport"
          content="width=device-width, user-scalable=no, initial-scale=1.0, maximum-scale=1.0, minimum-scale=1.0">
    <meta http-equiv="X-UA-Compatible" content="ie=edge">
    <title>Telegram Bot Contact Form</title>

    <link rel="stylesheet" href="https://maxcdn.bootstrapcdn.com/bootstrap/4.0.0/css/bootstrap.min.css">
</head>
<body>
    <nav class="navbar navbar-expand-lg navbar-light bg-light" style="margin-bottom: 50px;">
        <a class="navbar-brand" href="#">Telegram</a>
        <div class="collapse navbar-collapse">
            <ul class="navbar-nav mr-auto">
                <li class="nav-item">
                    <a class="nav-link" href="{{ url('/') }}">Contact Us</a>
                </li>
                <li class="nav-item">
                    <a class="nav-link" href="{{ url('/updated-activity') }}">Check Activity</a>
                </li>
                <li class="nav-item">
                    <a class="nav-link" href="{{ url('/send-photo') }}">Send Photo</a>
                </li>
                <li class="nav-item">
                    <a class="nav-link" href="{{ url('/') }}">GitHub Code</a>
                </li>
            </ul>
        </div>
    </nav>
    <div class="container">
        <div class="row">
            <div class="col-sm-10 offset-sm-1">
                @yield('content')
            </div>
        </div>
    </div>
</body>
</html>
Here, we are using bootstrap 4 for styling. We will extend this file to create our forms. In this file, a simple navbar is created and then a place to yield contents is created.
Create another file named message.blade.php in resources/views directory. This blade file will be used as our contact form. Copy the contents below to the message file:
@extends('layout')

@section('content')
    <form action="{{ url('/send-message') }}" method="post">
        {{ csrf_field() }}
        <div class="form-group">
            <label for="email">Email address</label>
            <input type="email" class="form-control" id="email" name="email" placeholder="Enter your email">
        </div>
        <div class="form-group">
            <label for="message">Message</label>
            <textarea name="message" id="message" class="form-control" placeholder="Enter your query" rows="10"></textarea>
        </div>
        <div class="form-group">
            <button type="submit" class="btn btn-primary">Submit</button>
        </div>
    </form>
@endsection
In this file we are extending the layout file and creating a form. This form will be submitted to send-message endpoint.
Create another view file named photo.blade.php to send photos to the Telegram channel. Copy the contents below to the photo file:
@extends('layout')

@section('content')
    <form action="{{ url('/store-photo') }}" method="post" enctype="multipart/form-data">
        {{ csrf_field() }}
        <div class="form-group">
            <div class="custom-file">
                <input type="file" id="file" name="file" class="custom-file-input">
                <label class="custom-file-label" for="file">Choose file</label>
            </div>
        </div>
        <div class="form-group">
            <button type="submit" class="btn btn-primary">Submit</button>
        </div>
    </form>
@endsection
In the above file, we are creating a simple form to submit a file to the store-photo endpoint. Our views are now created successfully.
Setting up our routes
Now let’s setup our routes endpoints. Go to your routes/web.php and replace the contents of that file with the contents below:
<?php

Route::get('/', 'TelegramBotController@sendMessage');
Route::post('/send-message', 'TelegramBotController@storeMessage');
Route::get('/send-photo', 'TelegramBotController@sendPhoto');
Route::post('/store-photo', 'TelegramBotController@storePhoto');
Route::get('/updated-activity', 'TelegramBotController@updatedActivity');
Our routes are now set up successfully.
Setting Up the logic
Let’s set up our logic to handle upload and submit it to the Telegram. Open TelegramBotController.php we created in the previous step and replace the contents of the file with contents present below:
<?php

namespace App\Http\Controllers;

use Illuminate\Http\Request;
use Telegram\Bot\FileUpload\InputFile;
use Telegram\Bot\Laravel\Facades\Telegram;

class TelegramBotController extends Controller
{
    public function updatedActivity()
    {
        $activity = Telegram::getUpdates();
        dd($activity);
    }

    public function sendMessage()
    {
        return view('message');
    }

    public function storeMessage(Request $request)
    {
        $request->validate([
            'email' => 'required|email',
            'message' => 'required'
        ]);

        $text = "A new contact us query\n"
            . "<b>Email Address: </b>\n"
            . "$request->email\n"
            . "<b>Message: </b>\n"
            . $request->message;

        Telegram::sendMessage([
            'chat_id' => env('TELEGRAM_CHANNEL_ID', ''),
            'parse_mode' => 'HTML',
            'text' => $text
        ]);

        return redirect()->back();
    }

    public function sendPhoto()
    {
        return view('photo');
    }

    public function storePhoto(Request $request)
    {
        $request->validate([
            'file' => 'file|mimes:jpeg,png,gif'
        ]);

        $photo = $request->file('file');

        Telegram::sendPhoto([
            'chat_id' => env('TELEGRAM_CHANNEL_ID', ''),
            'photo' => InputFile::createFromContents(file_get_contents($photo->getRealPath()), str_random(10) . '.' . $photo->getClientOriginalExtension())
        ]);

        return redirect()->back();
    }
}
Let me explain everything in the controller above. First, we have the updatedActivity method that we created previously. Next, we have the sendMessage method where we are simply returning message view.
In storeMessage method, we are simply validating email and message fields. We can send HTML to the Telegram but the only tags that are allowed are bold, strong, italic, emphasis, anchor, code and preformatted tag. So, we are building our message text in $text variable. \n is used to add a new line. If we want to send HTML, we have to add a new entry to the array with key parse_mode and value HTML. Then we are sending chat_id, parse_mode, and text to the sendMessage method on Telegram facade.
In sendPhoto method, we are returning photo view. Along with messages, we can also send photo, audio, document, video, voice, location, venue, contact and much more. In store photo method, we are validating the file. Then, we are sending chat_id and photo to the sendPhoto method. We are using InputFile::createFromContents as a value for photo key which allows us to send photo contents which we are getting by using file_get_contents method. We are also sending a random name with the original extension as the name for the file. Finally, we redirect back the user.
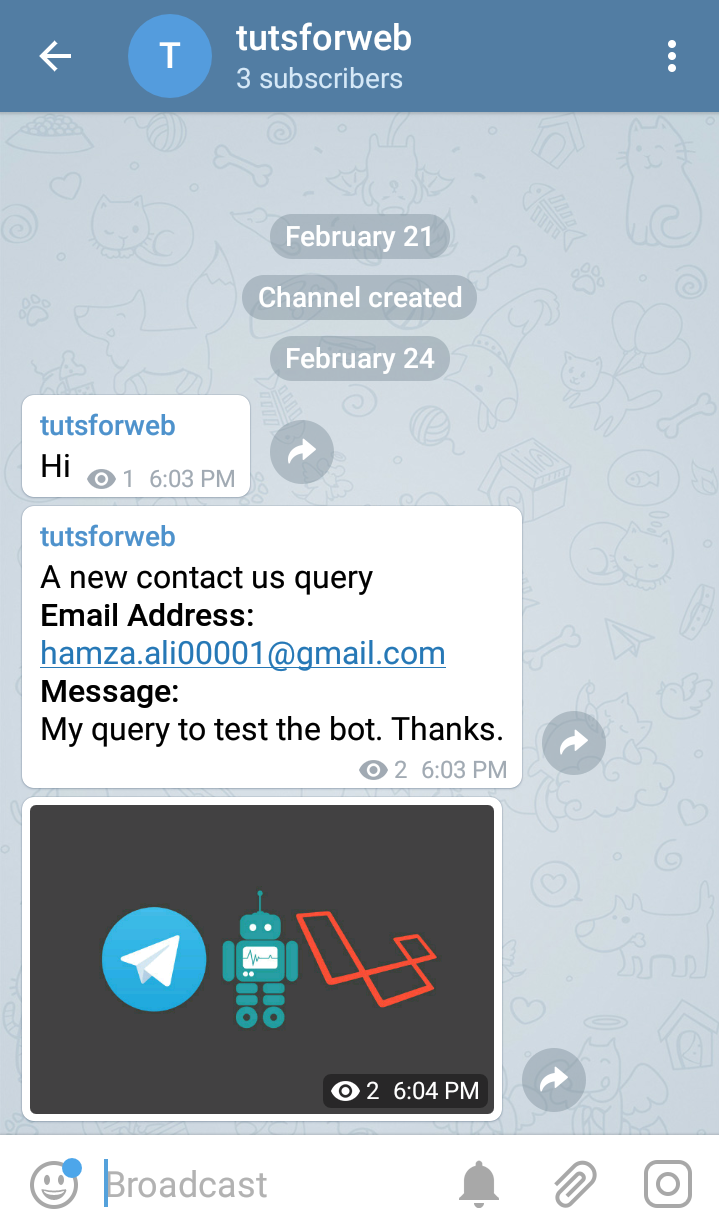
Here’s how our channel looks like after sending message and photo.
Well, your Telegram bot is created and working successfully. You can also join this channel at t.me/tutsforweb. Also, you can send messages through the bot and view them on the channel.
Find the source code for this article on GitHub:
I’ve uploaded the code to Heroku. You can find it live here.
I will also be writing part 2 for Telegram to create bots where we will be using webhook method. Our bot will talk to the user for specific commands like we talked to the botfather.