
Dropzone is the most popular, free and open source library that provides drag and drop file uploads with image previews.
In this tutorial, we will be using dropzone in our Laravel project to upload files. Furthermore, we will be writing some tests for file uploads.
This tutorial describes the following:
- Uploading multiple images with dropzone
- Saving images with unique file names to database
- Removing images directly from dropzone preview box
- Resizing images with intervention
- Image counter on uploaded images
- Creating table to show already uploaded images
I will be using Laravel 5.5 for this tutorial but you can follow along using previous versions as well. Here’s how it looks after completion:
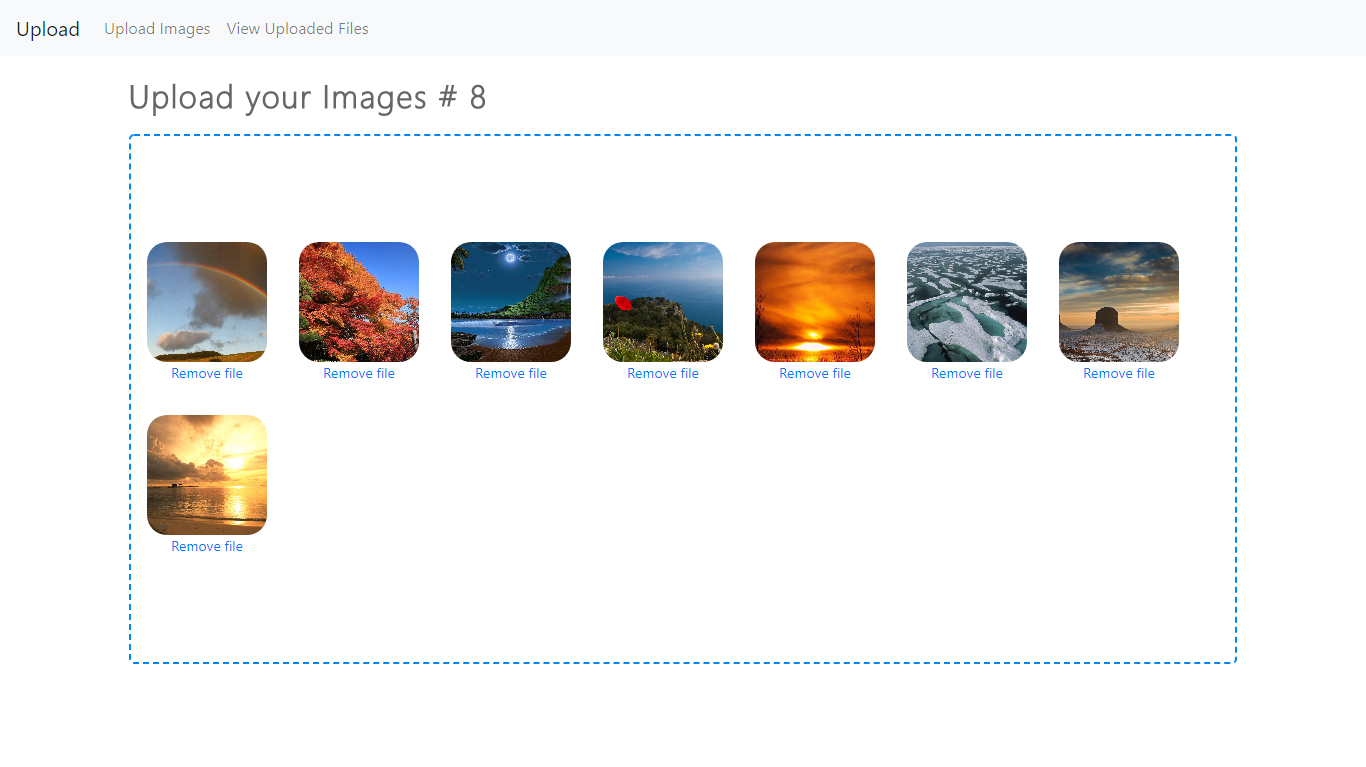
Table of Contents
Starting Out
Let’s start by creating a new Laravel project named upload by running the following command:
laravel new upload
In your .env file setup your database credentials and create the database. I will be using a MySQL database named upload.
Next download dropzone.css file and dropzone.js file from cdnjs.com and save them in your public/css and public/js directory respectively. Also, for styling download bootstrap 4 css file from its official website and save it in your public/css directory as boostrap.css. Also, create an empty custom.css file in your public/css directory. We will be using it for some defining custom styles. Dropzone uses jQuery, so you also need to download and save jquery.js in your public/js directory.
Setting our Routes
Let’s start setting our routes first. We will be using 4 routes in our application. These routes will be used to show upload form, submit images, delete images and view all uploaded images in the defined order. Copy the routes given below to your routes/web.php file:
Route::get('/', 'UploadImagesController@create');
Route::post('/images-save', 'UploadImagesController@store');
Route::post('/images-delete', 'UploadImagesController@destroy');
Route::get('/images-show', 'UploadImagesController@index');
Uploading files page
Now let’s create our first view to show the upload form. Create a main.blade.php file in resources/view directory. This will be our main file which we will extend further. Copy the contents below in your main.blade.php file:
<!doctype html>
<html lang="en">
<head>
    <meta charset="UTF-8">
    <meta name="viewport"
          content="width=device-width, user-scalable=no, initial-scale=1.0, maximum-scale=1.0, minimum-scale=1.0">
    <meta http-equiv="X-UA-Compatible" content="ie=edge">
    <title>Uploading images in Laravel with DropZone</title>

    <link rel="stylesheet" href="{{ url('/css/bootstrap.css') }}">

    @yield('head')
</head>
<body>
    <nav class="navbar navbar-expand-lg navbar-light bg-light">
        <a class="navbar-brand" href="{{ url('/') }}">Upload</a>
        <button class="navbar-toggler" type="button" data-toggle="collapse" data-target="#navbarNav"
                aria-controls="navbarNav" aria-expanded="false" aria-label="Toggle navigation">
            <span class="navbar-toggler-icon"></span>
        </button>
        <div class="collapse navbar-collapse" id="navbarSupportedContent">
            <ul class="navbar-nav">
                <li class="nav-item">
                    <a class="nav-link" href="{{ url('/') }}">Upload Images</a>
                </li>
                <li class="nav-item">
                    <a class="nav-link" href="{{ url('/images-show') }}">View Uploaded Files</a>
                </li>
            </ul>
        </div>
    </nav>
    <div class="container-fluid">
        @yield('content')
    </div>

    @yield('js')

</body>
</html>
In the file above, we are simply adding some links to require style-sheets, creating a simple bootstrap navbar and adding some blade components.
Now, create another view file named upload.blade.php. In this file, we will be adding dropzone for file uploading. Simply copy the contents below to your upload.blade.php file present in resources/views/upload.blade.php.
@extends('main')

@section('head')
    <link rel="stylesheet" href="{{ url('/css/dropzone.css') }}">
    <link rel="stylesheet" href="{{ url('/css/custom.css') }}">
@endsection

@section('js')
    <script src="{{ url('/js/jquery.js') }}"></script>
    <script src="{{ url('/js/dropzone.js') }}"></script>
    <script src="{{ url('/js/dropzone-config.js') }}"></script>
@endsection

@section('content')

    <div class="row">
        <div class="col-sm-10 offset-sm-1">
            <h2 class="page-heading">Upload your Images <span id="counter"></span></h2>
            <form method="post" action="{{ url('/images-save') }}"
                  enctype="multipart/form-data" class="dropzone" id="my-dropzone">
                {{ csrf_field() }}
                <div class="dz-message">
                    <div class="col-xs-8">
                        <div class="message">
                            <p>Drop files here or Click to Upload</p>
                        </div>
                    </div>
                </div>
                <div class="fallback">
                    <input type="file" name="file" multiple>
                </div>
            </form>
        </div>
    </div>

    {{--Dropzone Preview Template--}}
    <div id="preview" style="display: none;">

        <div class="dz-preview dz-file-preview">
            <div class="dz-image"><img data-dz-thumbnail /></div>

            <div class="dz-details">
                <div class="dz-size"><span data-dz-size></span></div>
                <div class="dz-filename"><span data-dz-name></span></div>
            </div>
            <div class="dz-progress"><span class="dz-upload" data-dz-uploadprogress></span></div>
            <div class="dz-error-message"><span data-dz-errormessage></span></div>


            <div class="dz-success-mark">

                <svg width="54px" height="54px" viewBox="0 0 54 54" version="1.1" xmlns="http://www.w3.org/2000/svg" xmlns:xlink="http://www.w3.org/1999/xlink" xmlns:sketch="http://www.bohemiancoding.com/sketch/ns">
                    <!-- Generator: Sketch 3.2.1 (9971) - http://www.bohemiancoding.com/sketch -->
                    <title>Check</title>
                    <desc>Created with Sketch.</desc>
                    <defs></defs>
                    <g id="Page-1" stroke="none" stroke-width="1" fill="none" fill-rule="evenodd" sketch:type="MSPage">
                        <path d="M23.5,31.8431458 L17.5852419,25.9283877 C16.0248253,24.3679711 13.4910294,24.366835 11.9289322,25.9289322 C10.3700136,27.4878508 10.3665912,30.0234455 11.9283877,31.5852419 L20.4147581,40.0716123 C20.5133999,40.1702541 20.6159315,40.2626649 20.7218615,40.3488435 C22.2835669,41.8725651 24.794234,41.8626202 26.3461564,40.3106978 L43.3106978,23.3461564 C44.8771021,21.7797521 44.8758057,19.2483887 43.3137085,17.6862915 C41.7547899,16.1273729 39.2176035,16.1255422 37.6538436,17.6893022 L23.5,31.8431458 Z M27,53 C41.3594035,53 53,41.3594035 53,27 C53,12.6405965 41.3594035,1 27,1 C12.6405965,1 1,12.6405965 1,27 C1,41.3594035 12.6405965,53 27,53 Z" id="Oval-2" stroke-opacity="0.198794158" stroke="#747474" fill-opacity="0.816519475" fill="#FFFFFF" sketch:type="MSShapeGroup"></path>
                    </g>
                </svg>

            </div>
            <div class="dz-error-mark">

                <svg width="54px" height="54px" viewBox="0 0 54 54" version="1.1" xmlns="http://www.w3.org/2000/svg" xmlns:xlink="http://www.w3.org/1999/xlink" xmlns:sketch="http://www.bohemiancoding.com/sketch/ns">
                    <!-- Generator: Sketch 3.2.1 (9971) - http://www.bohemiancoding.com/sketch -->
                    <title>error</title>
                    <desc>Created with Sketch.</desc>
                    <defs></defs>
                    <g id="Page-1" stroke="none" stroke-width="1" fill="none" fill-rule="evenodd" sketch:type="MSPage">
                        <g id="Check-+-Oval-2" sketch:type="MSLayerGroup" stroke="#747474" stroke-opacity="0.198794158" fill="#FFFFFF" fill-opacity="0.816519475">
                            <path d="M32.6568542,29 L38.3106978,23.3461564 C39.8771021,21.7797521 39.8758057,19.2483887 38.3137085,17.6862915 C36.7547899,16.1273729 34.2176035,16.1255422 32.6538436,17.6893022 L27,23.3431458 L21.3461564,17.6893022 C19.7823965,16.1255422 17.2452101,16.1273729 15.6862915,17.6862915 C14.1241943,19.2483887 14.1228979,21.7797521 15.6893022,23.3461564 L21.3431458,29 L15.6893022,34.6538436 C14.1228979,36.2202479 14.1241943,38.7516113 15.6862915,40.3137085 C17.2452101,41.8726271 19.7823965,41.8744578 21.3461564,40.3106978 L27,34.6568542 L32.6538436,40.3106978 C34.2176035,41.8744578 36.7547899,41.8726271 38.3137085,40.3137085 C39.8758057,38.7516113 39.8771021,36.2202479 38.3106978,34.6538436 L32.6568542,29 Z M27,53 C41.3594035,53 53,41.3594035 53,27 C53,12.6405965 41.3594035,1 27,1 C12.6405965,1 1,12.6405965 1,27 C1,41.3594035 12.6405965,53 27,53 Z" id="Oval-2" sketch:type="MSShapeGroup"></path>
                        </g>
                    </g>
                </svg>
            </div>
        </div>
    </div>
    {{--End of Dropzone Preview Template--}}
@endsection
In this file, we are first adding our dropzone.css and our custom.css file. Then we are adding jquery.js, dropzone.js and dropzone-config.js which we will be creating later.
In the content section, we have a h2 heading containing a span with an id of counter. This counter will be incremented once we upload an image, and decrements if we remove the image. Next, we are creating a form and assigning dropzone class to it. Further we have some text that will be shown in our upload box. There is also a fallback div, which will be shown in case JavaScript is not enabled and default file uploading box will be shown. You could check it out by disabling JavaScript. Below this, we have Dropzone preview template. I copied it from dropzonejs.com and it is simply used to show images thumbnail when we are uploading files. Also, if the image is uploaded successfully it will show a tick, otherwise it will show a cross and error. That’s what Dropzone Preview Template section does.
Recommended Learning:

The Ultimate Advanced Laravel Pro course (incl Vuejs)
12 hours video content, 1926 recommends, 4.3/5.0 stars and 91 Ratings
Configuring Dropzone
Now we are going to setup dropzone-config.js file and write all the configurations for dropzone. Create an empty file named dropzone-config.js in public/js directory and copy the contents below to this file.
var total_photos_counter = 0;
Dropzone.options.myDropzone = {
    uploadMultiple: true,
    parallelUploads: 2,
    maxFilesize: 16,
    previewTemplate: document.querySelector('#preview').innerHTML,
    addRemoveLinks: true,
    dictRemoveFile: 'Remove file',
    dictFileTooBig: 'Image is larger than 16MB',
    timeout: 10000,

    init: function () {
        this.on("removedfile", function (file) {
            $.post({
                url: '/images-delete',
                data: {id: file.name, _token: $('[name="_token"]').val()},
                dataType: 'json',
                success: function (data) {
                    total_photos_counter--;
                    $("#counter").text("# " + total_photos_counter);
                }
            });
        });
    },
    success: function (file, done) {
        total_photos_counter++;
        $("#counter").text("# " + total_photos_counter);
    }
};
In the file above, we are adding configuration options for dropzone. You can find all of the configuration options available on the dropzone official documentation.
First we are creating a variable named total_photos_counter. This variable will be used as a counter and we will increment or decrement it when needed. Then we will display it in span block with an id of counter. Next, we are creating an object named Dropzone.options.myDropzone. Remember myDropzone is the Camelized version of id present on our form which in our case is my-dropzone. Now let’s go through every option.
- uploadMultiple is set to true. We will be able to upload multiple files simultaneously. You can set this option to false and our application will still work.
- parallelUploads is set to 2. Dropzone will upload two files simultaneously. You can change it to any reasonable positive integer of your choice.
- maxFilesize is set to 16. Dropzone will only allow images with size less than 16MB. You can make it greater or smaller based on your needs.
- previewTemplate is set to
document.querySelector('#preview').innerHTML. We are simply gettinginnerHTMLof the preview template we defined in ourupload.blade.phpfile. - addRemoveLinks is set to true. Dropzone will show Remove button to remove our uploaded file.
- dictRemoveFile is set to
Remove file. This is the text that will be shown beneath the photos to remove images. You can change it to any text of your choice. - dictFileTooBig is set to
Image is larger than 16MB. This text will be shown when we try to upload images larger than 16MB size or whatever we defined inmaxFilesizeoption. - timeout is set to 10000. 10000 is the timeout for XHR request in milliseconds.
- Dropzone triggers many events and we use init function to setup our event listeners for those events. You can find the complete list of available events that dropzone triggers on dropzone events list. Here we are setting up an event listener for
removedfileevent. This event will be called when we will click remove file button to remove an uploaded file. Inside the event we are sending an ajax post request to/images-deleteendpoint that we will be setting up later. We are sending filename as id and csrf token present in our form. On success we decrement the counter. - Last one in our configuration file is the success property. It will be called when an image is uploaded successfully. Here we are incrementing the counter.
Well, that was a lot of options. But the good thing is you can reuse this in your projects without worrying about these configurations.
Custom Styles
At this time our upload form looks is very ugly. Open your custom.css file located in public/css directory and copy the styles below and paste them in the file.
.page-heading {
    margin: 20px 0;
    color: #666;
    -webkit-font-smoothing: antialiased;
    font-family: "Segoe UI Light", "Arial", serif;
    font-weight: 600;
    letter-spacing: 0.05em;
}

#my-dropzone .message {
    font-family: "Segoe UI Light", "Arial", serif;
    font-weight: 600;
    color: #0087F7;
    font-size: 1.5em;
    letter-spacing: 0.05em;
}

.dropzone {
    border: 2px dashed #0087F7;
    background: white;
    border-radius: 5px;
    min-height: 300px;
    padding: 90px 0;
    vertical-align: baseline;
}
Setting Up Migration
We will be saving file names in database. Run the command below to create a model named upload Upload and add m flag to create migration for it as well.
php artisan make:model Upload -m
Now replace up function present in the file create_uploads_table.php located in database/migrations directory with the contents below:
public function up()
{
    Schema::create('uploads', function (Blueprint $table) {
        $table->increments('id');
        $table->text('filename');
        $table->text('resized_name');
        $table->text('original_name');
        $table->timestamps();
    });
}
Run the the following command to run database migration:
php artisan migrate
In our uploads table, we are adding three additional fields. Filename will be the name of the uploaded file it is saved up with, original_name is the original name of the uploaded file and resized_name will be the name of the resized icon file.
Back-end Logic
Now, let’s create our UploadImagesController by running the following command:
php artisan make:controller UploadImagesController
We will be using intervention image library to resize images and create icon. Run the following command to require intervention library through composer:
composer require intervention/image 2.4
if you are using previous version of laravel, you must add the following entry to the providers array present in config/app.php:
Intervention\Image\ImageServiceProvider::class,
And the following in aliases array as well
'Image' => Intervention\Image\Facades\Image::class,
Now, copy the contents below to UploadImagesController:
<?php

namespace App\Http\Controllers;

use App\Upload;
use Illuminate\Http\Request;
use Illuminate\Support\Facades\Response;
use Intervention\Image\Facades\Image;

class UploadImagesController extends Controller
{

    private $photos_path;

    public function __construct()
    {
        $this->photos_path = public_path('/images');
    }

    /**
     * Display all of the images.
     *
     * @return \Illuminate\Http\Response
     */
    public function index()
    {
        $photos = Upload::all();
        return view('uploaded-images', compact('photos'));
    }

    /**
     * Show the form for creating uploading new images.
     *
     * @return \Illuminate\Http\Response
     */
    public function create()
    {
        return view('upload');
    }

    /**
     * Saving images uploaded through XHR Request.
     *
     * @param  \Illuminate\Http\Request $request
     * @return \Illuminate\Http\Response
     */
    public function store(Request $request)
    {
        $photos = $request->file('file');

        if (!is_array($photos)) {
            $photos = [$photos];
        }

        if (!is_dir($this->photos_path)) {
            mkdir($this->photos_path, 0777);
        }

        for ($i = 0; $i < count($photos); $i++) {
            $photo = $photos[$i];
            $name = sha1(date('YmdHis') . str_random(30));
            $save_name = $name . '.' . $photo->getClientOriginalExtension();
            $resize_name = $name . str_random(2) . '.' . $photo->getClientOriginalExtension();

            Image::make($photo)
                ->resize(250, null, function ($constraints) {
                    $constraints->aspectRatio();
                })
                ->save($this->photos_path . '/' . $resize_name);

            $photo->move($this->photos_path, $save_name);

            $upload = new Upload();
            $upload->filename = $save_name;
            $upload->resized_name = $resize_name;
            $upload->original_name = basename($photo->getClientOriginalName());
            $upload->save();
        }
        return Response::json([
            'message' => 'Image saved Successfully'
        ], 200);
    }

    /**
     * Remove the images from the storage.
     *
     * @param Request $request
     */
    public function destroy(Request $request)
    {
        $filename = $request->id;
        $uploaded_image = Upload::where('original_name', basename($filename))->first();

        if (empty($uploaded_image)) {
            return Response::json(['message' => 'Sorry file does not exist'], 400);
        }

        $file_path = $this->photos_path . '/' . $uploaded_image->filename;
        $resized_file = $this->photos_path . '/' . $uploaded_image->resized_name;

        if (file_exists($file_path)) {
            unlink($file_path);
        }

        if (file_exists($resized_file)) {
            unlink($resized_file);
        }

        if (!empty($uploaded_image)) {
            $uploaded_image->delete();
        }

        return Response::json(['message' => 'File successfully delete'], 200);
    }
}
This is our back-end logic. index method returns uploaded-images view. It also sends all of the Upload model data. We will be creating this view later as it will be used to show all of the uploaded images.
In create method, we are simply returning upload which we have created and discussed earlier.
Store method will be called when we upload a file through dropzone. Dropzone will send an array of images because we set uploadMultiple to true in dropzone-config.js file. Uploaded images will be saved in public/images directory. If the directory does not exist, it will be created. We are then looping through all of the files, creating name and resize_name variables. $name will be the unique name for the uploaded file and $resize_name will be the name of the icon created. Intervention image library is further used to create an icon of width 250px without changing the aspect ratio. Finally a database record is created and a successful json response is sent back.
Destroy method will be used to delete images. We are sending the id with the request in our dropzone-config.js file. This id is the original_name of the file. So, Simply a database query is generated and if the record does not exists, 400 response is returned. If the record exist, we delete the files and the record if they exist and return a successful json response.
Viewing our Uploaded Images
In our index method, we are returning uploaded-images view but we have not created it yet. So, create a new uploaded-images.blade.php file and copy the contents below and paste them in it.
@extends('main')

@section('js')
    <script src="{{ url('/js/jquery.js') }}"></script>
@endsection

@section('content')
    <div class="table-responsive-sm">
        <table class="table">
            <thead>
            <tr>
                <th scope="col">Image</th>
                <th scope="col">Filename</th>
                <th scope="col">Original Filename</th>
                <th scope="col">Resized Filename</th>
            </tr>
            </thead>
            <tbody>
            @foreach($photos as $photo)
                <tr>
                    <td><img src="/images/{{ $photo->resized_name }}"></td>
                    <td>{{ $photo->filename }}</td>
                    <td>{{ $photo->original_name }}</td>
                    <td>{{ $photo->resized_name }}</td>
                </tr>
            @endforeach
            </tbody>
        </table>
    </div>
@endsection
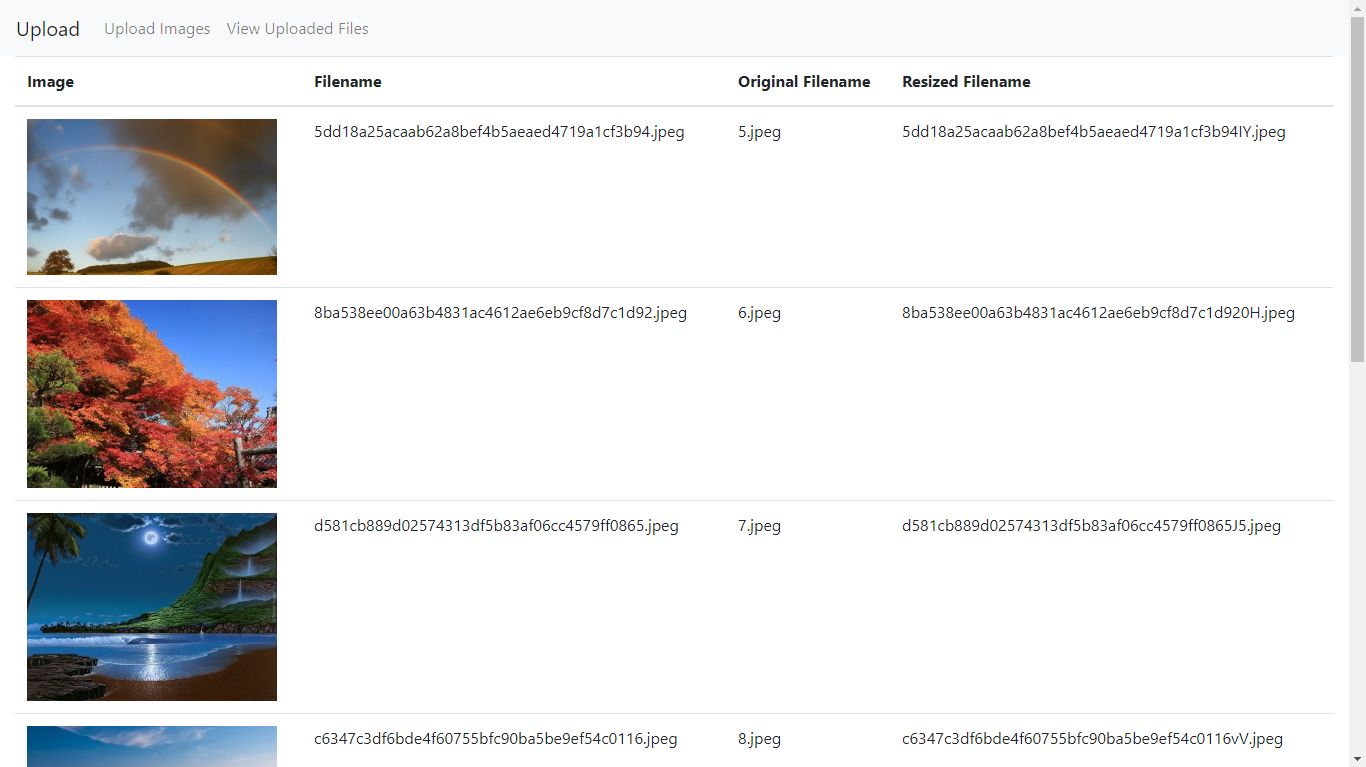
Here we are simply extending the view from main.blade.php and creating a simple bootstrap table. We are looping through all of the records and showing their filename, original_name, resized_name and the image as well.
Recommended Learning:

Laravel Multi User Blogging Platform with SEO (2 projects)
23.5 hours video content, 1644 recommends, 4.5/5.0 stars and 202 Ratings
Here’s how this table looks
You can find the full code for this tutorial here
Well, that’s how we can use dropzone with laravel.