
Laravel Homestead is an official, pre-packaged Vagrant box that allows you to develop amazing applications without installing prerequisites such as PHP, a web server and other development software on your machine. Homestead runs on Windows, Mac or Linux environments. It installs all the development software required to build amazing Laravel applications.
In this tutorial, we will install Laravel Homestead on Windows 10. I am going to show you step by step procedure for installing Homestead with VirtualBox and vagrant. There are some problems when installing Homestead on windows and we will look at solving all of them effectively. Now, let’s dive in.
Table of Contents
1. Hardware Virtualization
When you are installing Homestead on Windows you need to enable Hardware virtualization (VT-x). Download the utilities from your processor manufacturer to check whether hardware virtualization is enabled or disabled.
- For Intel processors, download Intel Processor Identification Utility.
- For AMD processors, download AMD Virtualization technology.
For Intel processors download and install the Intel processor identification utility. Open this application and select CPU technologies tab. On this tab, check if Intel(R) Virtualization technology is enabled.

For AMD processors download and install AMD-V Technology and Microsoft Hyper-V System Compatibility Check. Open the executable file (.exe) and it will tell you if hardware virtualization is enabled or disabled. If it is enabled it will show like this.

If your hardware virtualization is enabled continue to step two.
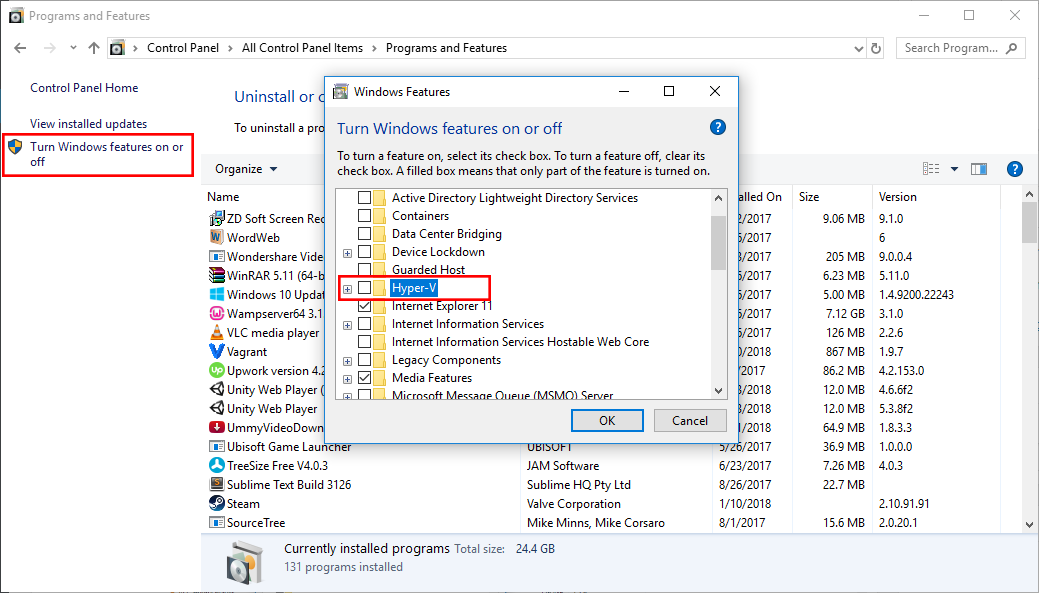
If hardware virtualization is disabled there are some steps that you can follow. First, uninstall Hyper-V by opening Control Panel\All Control Panel Items\Programs and Features and selecting turn windows features on or off option from the sidebar. After windows features box is open disable Hyper-V if it is enabled.
You may also check your BIOS for options labeled Intel VT-x or Intel Virtualization Technology and enable it. If it does not work, then google your computer model or your PC configuration. If you have a modern computer, chances are it will be enabled by default.
2. Downloading VirtualBox and Vagrant
You need to download the latest versions of VirtualBox and Vagrant to work with Homestead.
Download VirtualBox: VirtualBox download link
Download Vagrant: Vagrant download link
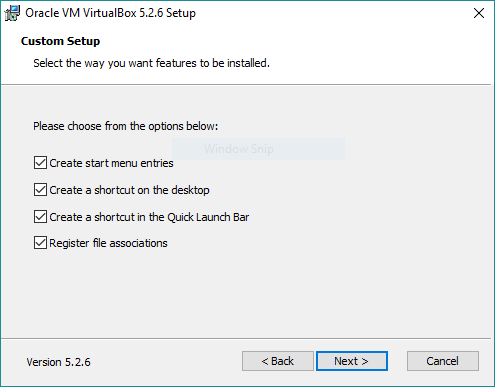
After downloading both of these, first install VirtualBox. When installing VirtualBox, do not uncheck any check boxes during the installation. This is important.
Then install vagrant. If required restart your PC after the installation for them to integrate properly.
3. Git Bash
You also need to install git bash. You probably have git bash installed on your PC. If it is installed move down to step 4.
Download Git Bash: Git Bash download link
After the download is complete, install it.
4. Installing Homestead Box
Open git bash and run the following command to add Homestead box to your vagrant installation. If you have a slow internet connection or you get any errors after running the following command, continue reading.
vagrant box add laravel/homestead
It will take some time to download the box depending upon your internet connection. It is a huge file with the size of more than 1GB. If the box download and installs successfully, continue to step 5.
Now, it is possible that you will get some errors like The box laravel/homestead could not be found. Try installing Microsoft Visual C++ 2010. Now if you have a very good internet connection try running the above command again. If you have do not have a very good internet connection like some third world countries have and box downloading is getting interrupted, try the following steps.
You can download the homestead box manually and then add it to your vagrant installation. Find the latest released version of laravel/homestead box available from here: laravel/homestead
Now, download homestead box using the link below. You need to change the version number of laravel/homestead to the latest version available in the link below. At the time of writing this article, latest available version is 5.0.1. You can download it from your browser or some downloading software like internet download manager.
https://app.vagrantup.com/laravel/boxes/homestead/versions/5.0.1/providers/virtualbox.box
After you have downloaded the box, open the folder where your downloaded file is present. It is possible that window is not showing file extensions. Select the view tab from the folder your downloaded file is present and check File name extensions.
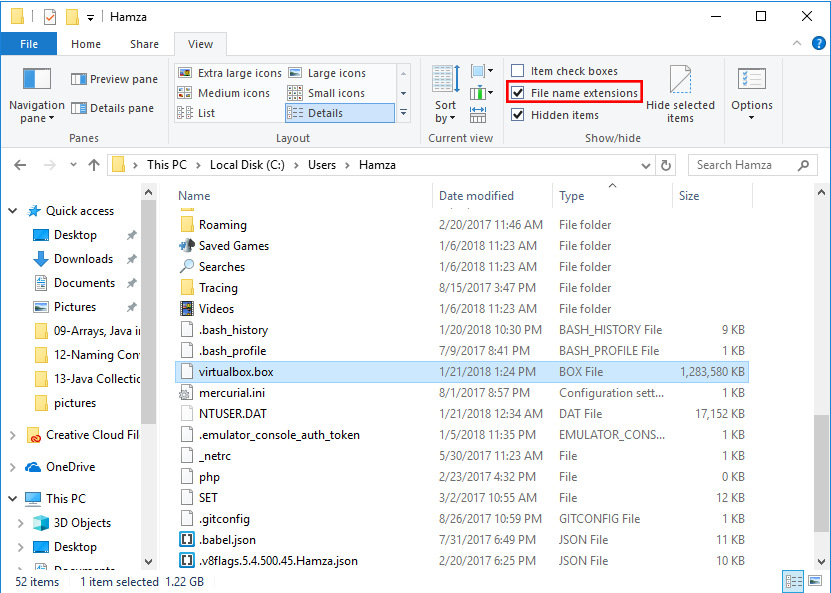
Now rename the downloaded file to virtualbox.box. Make sure it has the .box extension. Now move the downloaded file to C:\Users\USER_NAME where USER_NAME is your username. Run the following command to add the downloaded box to your vagrant installation. Make sure you replace USER_NAME in the command below to your username.
vagrant box add laravel/homestead file:///c:/Users/USER_NAME/virtualbox.box
In the above command file:///c:/Users/USER_NAME/virtualbox.box shows the absolute path to virtualbox.box file. In this URL we are using lowercase for our disk name and forward slash instead of backslash. I will be using USER_NAME in this tutorial for the username, make sure you replace it with yours.
Now, navigate to your vagrant homestead box directory on windows:
C:\Users\USER_NAME\.vagrant.d\boxes\laravel-VAGRANTSLASH-homestead
In this folder, create a file named metadata_url without any extension and open the file in notepad or any editor of your choice. Add this link in your file:
https://atlas.hashicorp.com/laravel/homestead
Make sure you do not add any new line to this file. Now rename the folder 0 present in the same directory to 5.0.1. Note that 5.0.1 is your homestead box version.
Now your homestead box is added successfully.
5. Cloning Homestead
On your git bash, type cd ~ and press enter. Now run the following command to clone Homestead
git clone https://github.com/laravel/homestead.git Homestead
It will clone Homestead repository from Github to C:\Users\USER_NAME directory where USER_NAME is your username. Now run the following command:
cd Homestead
It will change current directory to C:\Users\USER_NAME\Homestead. Now run the following command:
bash init.sh
This command will create Homestead.yaml configuration file which will be placed in C:\Users\USER_NAME\Homestead directory.
6. Creating ssh keys
Now we need to create ssh keys. Go to C:\Users\USER_NAME directory and find out the folder named .ssh. If the folder exists, navigate into the folder and see if two files named id_rsa and id_rsa.pub are present. If they are present, continue reading from step seven. If the folder .ssh does not exist or the folder is present but the two files are not present. Run the following command from git bash. Make sure to replace my_email@example.com with your email address in the command below.
ssh-keygen -t rsa -C “my_email@example.com”
Just press enter whatever command line asks you. It will ask you two things, simply press enter. It will create a folder named .ssh with two files named id_rsa and id_rsa.pub in it.
7. Editing Configuration File
Now, let’s edit our Homestead.yaml configuration file which we generated. Go to C:\Users\USER_NAME\Homestead and open Homestead.yaml with any text editor. These are the original contents of the file:
---
ip: "192.168.10.10"
memory: 2048
cpus: 1
provider: virtualbox

authorize: ~/.ssh/id_rsa.pub

keys:
    - ~/.ssh/id_rsa

folders:
    - map: ~/code
      to: /home/vagrant/code

sites:
    - map: homestead.test
      to: /home/vagrant/code/public

databases:
    - homestead

# blackfire:
#     - id: foo
#       token: bar
#       client-id: foo
#       client-token: bar

# ports:
#     - send: 50000
#       to: 5000
#     - send: 7777
#       to: 777
#       protocol: udp
Let me start by dividing and explaining it step by step. We will also modify it to configure homestead.
ip: "192.168.10.10"
memory: 2048
cpus: 1
provider: virtualbox
This is the first part of the file. The first line contains the IP address where homestead will listen to requests. You can edit this IP address but it is not required. The next line contains the maximum amount of memory that will be consumed by it. It is set to 2048 which is 2GB. You can change it as well. The third line says it will use one CPU and the last line says the provider is the virtual box. There is no need to edit any of the lines in this section.
authorize: ~/.ssh/id_rsa.pub

keys:
    - ~/.ssh/id_rsa
In these lines, we are supposed to set up our ssh keys. We have already created ssh keys and now we are going to add the location of those two files in our configuration file. After editing these lines, it will look like this:
authorize: c:/Users/USER_NAME/.ssh/id_rsa.pub

keys:
    - c:/Users/USER_NAME/.ssh/id_rsa
When pointing to the paths of the file, use lowercase of your drive name and forward slash instead of the backslash. Write the location of both the files the same way, I have written above. Don’t forget to replace USER_NAME with your username. In Homestead.yaml file we will always use lowercase of drive name (in our case c instead of C) and forward slash instead of the backslash.
folders:
    - map: ~/code
      to: /home/vagrant/code
In these lines, we are mapping a folder that will be used by both our PC and vagrant. This folder will be in sync. Any change in this folder from our PC will also be visible from vagrant and vice versa. - map: ~/code means the folder which will be located on our PC and to: /home/vagrant/code shows the folder which will be present in our vagrant synced with the folder in - map: ~/code. - map: ~/code shows your project folder that will be available on your PC. You can change it to anywhere on your PC. Don’t forget the URL rules that we discussed above. In my case, I will use c:/Users/USER_NAME/code where USER_NAME is my username. You can’t use ~ sign, you have to change it to a valid directory. You can also use any folder name for the vagrant as well like /home/vagrant/YOUR_FOLDER_NAME. In my case I will keep it the same. Here’s my final version of the above lines where USER_NAME is my username:
folders:
 - map: c:/Users/USER_NAME/code
 to: /home/vagrant/code
Let’s move on to the next section.
sites:
 - map: homestead.test
 to: /home/vagrant/code/public
In these lines, the configuration file says that when we will go to http://homestead.test from our browser then the vagrant will send the request to /home/vagrant/code/public. We could have multiple Laravel projects, so I will change /home/vagrant/code/public to /home/vagrant/code/laravel/public. We do not have any laravel project till now but we will be creating them later. If you have used apache virtual host before, then you will be understanding it very easily. When we have multiple applications, we keep on adding them to the configuration like this:
sites:
 - map: homestead.test
 to: /home/vagrant/code/laravel/public
 - map: example.test
 to: /home/vagrant/code/example/public
 - map: blog.test
 to: /home/vagrant/code/blog/public
It is important to note that if you have changed folder name in the previous step like /home/vagrant/YOUR_FOLDER_NAME, then you will use the same name as the prefix of laravel/public. So, it will look like /home/vagrant/YOUR_FOLDER_NAME/laravel/public. We will see how we can add multiple projects to our configuration. Untill now just use only one project. In this section, you are not supposed to change anything else except your folder name if you have changed that in the previous step.
databases:
 — homestead
This line will simply create a database name homestead in our vagrant. We can use multiple databases by adding their names next to databases:. In this section there is nothing to change.
That’s all about Homestead.yaml file configuration. Here is the final version of my file. It uses my username in the path, so change it according to your system if you are copying it.
---
ip: "192.168.10.10"
memory: 2048
cpus: 1
provider: virtualbox

authorize: c:/Users/Hamza/.ssh/id_rsa.pub

keys:
    - c:/Users/Hamza/.ssh/id_rsa

folders:
    - map: c:/Users/Hamza/code
      to: /home/vagrant/code

sites:
    - map: homestead.test
      to: /home/vagrant/code/laravel/public

databases:
    - homestead

# blackfire:
#     - id: foo
#       token: bar
#       client-id: foo
#       client-token: bar

# ports:
#     - send: 50000
#       to: 5000
#     - send: 7777
#       to: 777
#       protocol: udp
8. Editing the Host file
You will not be able to hit http://homestead.test from your browser. You have to add this to your windows hosts file. After adding it to your hosts file, browser request will go to the IP address that we defined in our Homestead.yaml configuration file. Navigate to C:\Windows\System32\drivers\etc\ directory and open the file named hosts with any text editor. Text editor should be opened in administrator mode otherwise you will not be able to make changes. If you have changed the IP address in the first section of editing our configuration file, you must use that IP address. In my case, I have not changed it, so it is 192.168.10.10. Add the following at the end of your host file.
192.168.10.10 homestead.test
If you have created multiple projects, you can add them to your hosts file like this:
192.168.10.10 homestead.test
192.168.10.10 example.test
192.168.10.10 blog.test
You can add any number of projects in your hosts file. Now http://homestead.test is accessible from your browser but don’t access it yet.
9. Starting Homestead
We can start our homestead using the command vagrant up. We can only run this command from C:\Users\USER_NAME\Homestead beacuse our homestead repository resides in this project. We can use aliases so that we can run it from anywhere using git bash. To do this, create a file named .bash_profile and copy the below lines to the file and save it.
alias ..="cd .."
alias vm="ssh vagrant@127.0.0.1 -p 2222"
function homestead() {
 ( cd ~/Homestead && vagrant $* )
}
Now close your git bash and reopen it for changes to take effect. Now running homestead up will run the vagrant homestead box from anywhere through git bash. Running homestead halt will terminate vagrant box. In this step, you are only supposed to create .bash_profile file, copy above contents to the file and restart git bash.
10. Creating Laravel project
Let’s create our first Laravel project though homestead. Till now we don’t have any Laravel folder either in our c:/Users/USER_NAME/code or our /home/vagrant/code folder. But now we are going to create our project. First, run homestead by using the following command from your git bash.
homestead up
Then run the following command to log in to your vagrant:
homestead ssh
You can check all the folder present in the current directory by typing ls in git bash. Till now we only have code folder or if you have changed the name in the previous step you will see that name. Type cd code or if you have changed the folder name than cd YOUR_FOLDER_NAME and it will change the current directory to code. This folder is empty, you can check it by running ls command. Now run the following command in your git bash to create your first Laravel project:
composer create-project --prefer-dist laravel/laravel laravel
It will create a new Laravel project in a folder named laravel. Type ls and you will see a folder named laravel. If you would go to your code directory on windows, you will see a folder named laravel with all of the laravel project contents as well. This shows that both the folders are actually the same folder.
11. Running our Application
Hit http://homestead.test from your browser and make sure homestead is running. You can use homestead up to run your homestead. You will see Laravel 5 welcome page now. Open code folder available in your windows on your favorite text-editor or IDE and start creating applications.
12. Creating another project
Congratulations. We have successfully created our first Laravel project on Homestead. Let’s see how we can create another project. To do this, you need to add entries to your Homestad.yaml file as we discussed previously. Let’s create a project named example. Since we have already mapped c:/User/USER_NAME/code folder to /home/vagrant/code in the previous steps, we are not required to map multiple folders. But if you want you can. Let’s add a new entry to sites section. We will map example.test to /home/vagrant/code/example/public. Here is the final version of sites section:
sites:
 - map: homestead.test
 to: /home/vagrant/code/laravel/public
 - map: example.test
 to: /home/vagrant/code/example/public
Now, add a new entry to databases section as well. We will name the database example for this project. Here is the final version of databases section:
databases:
 - homestead
 - example
We have made necessary changes to our Homestead.yaml file. Here is the final version of my Homestead.yaml file.
---
ip: "192.168.10.10"
memory: 2048
cpus: 1
provider: virtualbox

authorize: c:/Users/Hamza/.ssh/id_rsa.pub

keys:
    - c:/Users/Hamza/.ssh/id_rsa

folders:
    - map: c:/Users/Hamza/code
      to: /home/vagrant/code

sites:
    - map: homestead.test
      to: /home/vagrant/code/laravel/public
    - map: example.test
      to: /home/vagrant/code/example/public

databases:
    - homestead
    - example

# blackfire:
#     - id: foo
#       token: bar
#       client-id: foo
#       client-token: bar

# ports:
#     - send: 50000
#       to: 5000
#     - send: 7777
#       to: 777
#       protocol: udp
Now add the following line at the end of your windows hosts file:
192.168.10.10 example
Create a new project named example in your code folder in your vagrant. To do this you need to run homestead ssh to log in and run cd code to enter code folder. Now run the following command to create a laravel project named example:
composer create-project --prefer-dist laravel/laravel example
Now that everything is setup. Simple press Ctrl + C to get out of the vagrant box. Run the following command for vagrant to make provision:
homestead provision
Now, you will be able to hit http://example.test on your browser and you will also find an example Laravel project in your code directory. That’s all for installing Homestead on windows.
You can learn more about available options in Homestead official documentation.
Leave a comment for any of your question or queries regarding the tutorial.